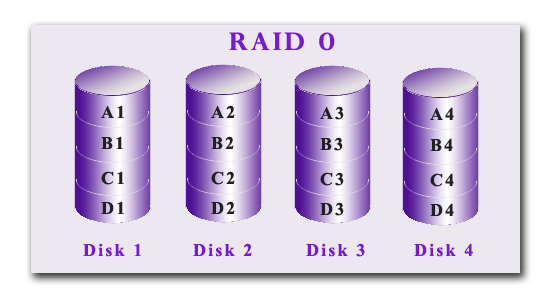
RAID 0
Raid 0 is the simplest RAID level. It uses striping only to get higher performance. Therefore it is not really a RAID system, because it has no data redundancy. Because of that, it is not ecommended to store important data with RAID 0. If one disk is lost, so will all data stored on that disk be as well.
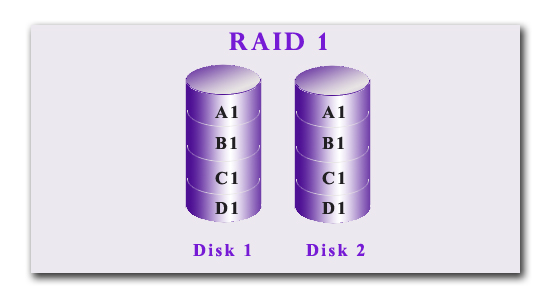
RAID 1
RAID 1 is the easiest way to get data redundancy. It uses mirroring to store two copies of all data on two separate disks. Many computer systems need high availability without the requirement of more performance. In that case RAID 1 can be a good solution. Neither RAID 0 nor RAID 1 uses much computing power. The RAID controllers that handle these two RAID levels are therefore cheaper than controllers for higher RAID levels.
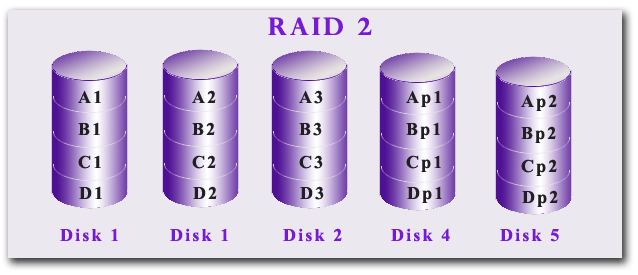
RAID 2
RAID 2 use striping and a special kind of redundancy technique, which is not described above. The technique used is bit level striping with Hamming code ECC. Separate disks are used for data storage and ECC. The Hamming codes are calculated and written to the ECC disks at the same time as data is written to its specific disk. The code is calculated again when data is read from the disks. This is done to check that it has not been changed since the time it was written. The complicated and expensive RAID controller hardware needed for this level of RAID, and the minimum number of hard drives required, is the reason this level is not used today
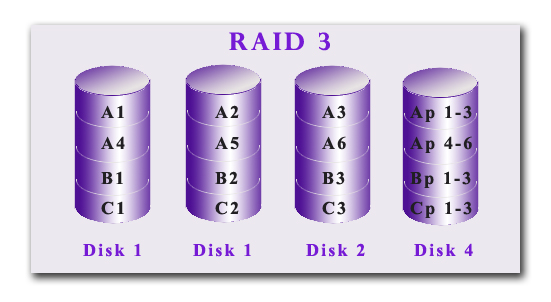
RAID 3
This level uses data striping with parity. The parity is stored on dedicated disks. Parity makes it possible to, for example, store data on two disks with striping and have a third disk to store the parity. The performance is good but when data is written, the parity data will slow down the writing process.
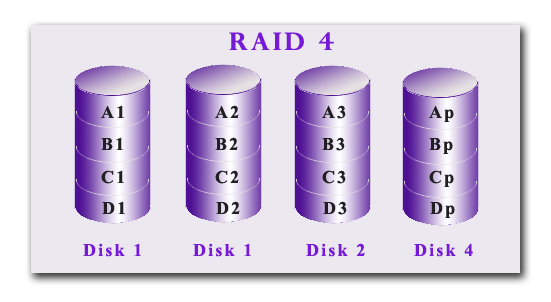
RAID 4
RAID 4 is very similar to RAID 3. The difference is that it use larger blocks of data than RAID 3 does. This makes it possible to change the data stripe size to suit the applications needs. In the same way as with RAID 3, however, the extra parity disk will have a negative impact on performance.
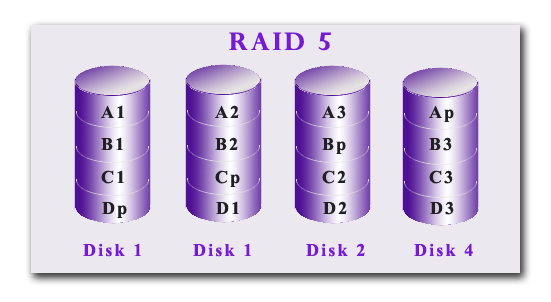
RAID 5
This level is similar to RAID 4 in such a way that it uses data striping with larger blocks of data. The difference is that it tries to remove the bottleneck that RAID 4 has. That is done by skipping the dedicated parity disks. The parity is instead distributed amongst all disks. When the bottleneck is removed still one problem remains. It still needs to calculate the parity, and that is still more costly than for example mirroring. For fault tolerance and performance reasons, the data and parity are never stored on the same disk. This means that if one disk goes down, that data can always be recovered by using data on other disks to calculate what data disappeared.
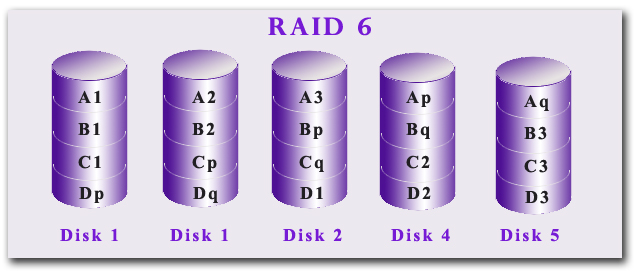
RAID 6
Similar to RAID 5, RAID 6 (which is block-level striping with double distributed parity) provides fault tolerance of two drive failures; the array continues to operate with up to two failed drives. This makes larger RAID groups more practical, especially for high-availability systems. This becomes increasingly important as large-capacity drives lengthen the time needed to recover from the failure of a single drive. Single-parity RAID levels are as vulnerable to data loss as a RAID 0 array until the failed drive is replaced and its data rebuilt; the larger the drive, the longer the rebuild takes. Double parity gives additional time to rebuild the array without the data being at risk if a single additional drive fails before the rebuild is complete. Like RAID 5, a single drive failure results in reduced performance of the entire array until the failed drive has been replaced and the associated data rebuilt.
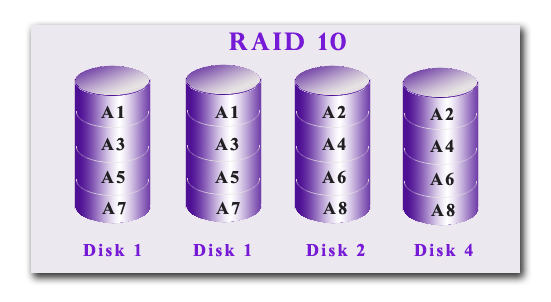
RAID Combinations
The idea behind combinations is to get the advantages from the different levels such as 0+1, 1+0, 0+3, 3+0, 0+5, 5+0, 1+5, and 5+1. The most common one is 1+0 because it gives you both performance and good data redundancy without the need of complicated and expensive hardware that other combinations needs. The extra waste of space may be cheaper than the more expensive RAID controller.